Wednesday, March 11, 2015

Steaming Ribs Movie


Here is a 90 second clip showing Colton and Nick bending a rib into Nick's Arrow 14 hull. 


The rib is 1/4x1/2 quarter sawn oak set into a hull formed from 3/8x3/4 Douglas fir stringers. They are using a 1/8x5/4 piece of Douglas fir as a backing strap to keep the outer edge of the oak rib from fraying as the wood fibers gets stretched on the outer side of the curve. They have roughly one minute before the oak cools to bend it into place.

Sunday, March 8, 2015

Steaming Ribs


We are now steam bending the ribs that fit inside the stringers. You can see the steam box in the background. If you look out the window you will also see snowbanks that reach up to half the window height on the left side, indications of the snowiest winter on record here in Boston. 

Monfort's design calls for 3/16"x1/2" but we were given scrap quarter sawn oak from a toboggan building project already cut to 5/16" depth. The wood is a little harder to bend because of its relatively low moisture content, but with the ribs in place, the hull is very stiff. 

We soak the ribs for several days in a set of chambers made from PVC drainage pipe cut to 45" - just a little taller than the 42" ribs. With a cap on top of the PVC tube, the ribs sit suspended in the water which we fill to the brim. The buoyancy of the wood should put the surface of the wood under pressure forcing as much moisture into the wood fibers as possible. 

What seems most important in the bending process is to get the wood as hot as possible. We use the kind of thermometer sold for outdoor grills poked down into the steamer to make sure that we have reached close to 212 degrees before we put the wood in the chamber. The general rule for steaming wood is an hour per inch of thickness. 20 minutes works well for our ribs. 


Here is the method we have used to bend the ribs:

1. Rib positions are carefully marked on the outside of the stringers by placing a piece of surveyor's tape over the hull and marking the positions on all stringers and gunwales. That allows us to quickly get the rib into position on both sides.

2. After 20 minutes at 212 degrees, two benders are ready at the box with heavy gloves. One opens and shuts door to conserve heat, while the other fits a very bendable wooden strap to the back of the rib. We use a piece of fir cut to 1/8" depth as a strap rather than metal because we worry a metal strap would wick away the heat quickly. We start with the fir strap in the steamer and draw it out with the first rib. 

3. Both benders race to the hull knowing bending time is one minute. 

4. We place the rib and strap above the hull and bend down with pressure on the strap from both sides to keep the rib's outside edge from splintering as that side of the rib gets stretched. Quickly but gently we bend the rib to take the shape of the hull.

5. The first bender then passes the rib inside the hull and we gently squeeze clamp it at the points of maximum curve while pushing up from the ends of the rib to make sure it meets all stringers and the keelson. If the rib is sufficiently hot, it should go in quite easily - at least during that first 60 seconds. You will feel it stiffening very quickly. 

Monfort's "clamp its" work well in securing the rib to the stringers because they can be set up beforehand on the stringers and then slid over the rib. But with practice, you can also quickly secure the rib with cable ties before it cools.


The boat on the left has all but its end ribs in place, drying out before we will glue them in place. While you could laminate ribs or probably get the bend with a boiling or soaking, steaming the wood is very exciting - and a great place to learn about wood with both the successes and failures. If a rib breaks, examine the point of failure carefully and you will probably find that the wood grain has "run out" - the grain veering off toward the edge just at the break or you may find a splintery edge that should have been sanded before steaming. Small knots or other irregularities in the grain will also cause breaks. Save the broken pieces if they are long enough as they can be used later as cutwaters, cross braces for sailing rigs, or deck ribs if you sew spray covers for the ends of the canoe.

Gluing Stringers to Stems and Shaping the Stringers


Here Mathias glues and clamps the stringers to the stem as Jonathan hands him clamps. You can see how carefully he has cut the acute angles that will allow a good glue surface between stringer and stem, the product of careful measurement and work with the pull saw. 


When all the stringers are glued into place along the stem, they must be shaped with rasps and sanding blocks until they meet in a fair curve. The top stringer in this picture joins the stem with the most difficulty because it must be twisted slightly. Some builders would put it in a long thin heavy duty poly bag and steam it to accomplish a radical twist. We just gave each of these a slight twist and then will sand down the sharpest outside edge. The top stringer above still needs more sanding so that the dacron skin will fit easily around the whole bow. You can see the sanding block made with red 80 girt sandpaper fixed to a block with 3M 77 adhesive. When the sandpaper wears out, we use a heat gun to soften the adhesive and put a new sheet on with a little more adhesive on the paper. The blocks allow you to fair several stringers together to create the overall shape of the bow.


In this photo Jamie is putting a curved edge on the stringers over which we will stretch the dacron skin. Just behind him you can see the pull saws, coping saws and rasps that now do much of the work of fitting the stringers. 


Chris uses a rasp in this photo to round the edges of the stringers. Block planes would be useful in this work but we do not have a set. The fir is soft enough that the rasp can do the work quite easily.


                 Here you can see the top stringers now rounded as they comes to meet the stem. 

Saturday, March 7, 2015

Gluing Up the Gunwales and Stringers


Tools


The tools we've used have followed a progression from left to right with the levels most important at the start to make sure that the station molds and stanchions all would sit in a parallel set of planes and give the canoes a symmetrical shape.

We used the glue guns to anchor cleats to the cardboard and temporarily set the stems on the center line of the strong backs. We also use them for many small tasks like glueing scraps of wood together as jigs. The plastic bag just above the glue guns holds bandages and first aid. 

At the far right, you can see part of one of the eight plans we have posted around the studio so each builder can check the details and building instructions. A bulletin board holds pictures of finish details from previously built skin on frame canoes.

We put these pictures from Tom Loeser's sculpture exhibit "Flotilla" up on the board as a cautionary reminder. 


Tom actually built these sculptures by taking Platt Monfort's designs and shifting the stations so that the boats would bend and curve. We know that if we don't get the molds straight and true, we could easily build a boat that keeps turning left.


At the strong backs


Each builder has a mat knife and two bins, one with zip or cable ties and one with "clamp its," an ingenious wire clamp that Platt Monfort invented to help in holding parts together while gluing. They can be easily adjusted so that you can control the pressure while gluing. Too much pressure from a clamp, the problem with spring clamps, and you can squeeze all the glue out of the joint. Too little pressure will yield shifts in alignment or too little contact between the members. The bins are made from recycled lemonade cartons from our dining hall. 


We use cable ties to hold the stringers down to the stations by poking a hole in the cardboard and then securing the stringer so that it doesn't pop up and distort the hull when the ends are glued to the stems or the ribs are put in place.


We also use them to glue stringers to stems if we run out of clamps - which happens most every day. Chris is our most artful cable tie clamper. As you can see in this photograph, he leaves the ends of the stringers sticking beyond the stem. He puts one tie on the inside of the stem, one outside, and then ties them together with a third he can use to position the stringer and control the amount of pressure on the the two vertical ties. We wear gloves for all work with glue. 


Steam Box


I built a steam box to bend the oak ribs in our school's shop using scrap plywood, the frame of a futon that someone put out on trash day, and oak dowels. 


Andrew measuring for a cut on one of the bottom stringers which have a complex twist as they join the stem.


All of the stringers had to be cut at complex angles where they joined the stems and then glued using a two part epoxy. To adjust and refine the angled cuts, we used strips of 80 grit sandpaper attached to stiff cardboard with 3M 77 spray adhesive. If you pass the sandpaper back and forth between the stringer and stem with the rough side facing the stringer, you can make the fit very precise.


Sanding blocks to adjust cuts to stringers as they meet stems


We mark uncut pieces that stick out into the center of the studio with orange 
so that we won't bump into them when walking between boats. 


Setting Up the Station Molds and Starting the Hull


 Strong backs set up: Because our space is so limited, the strong backs have to be set up in a chevron pattern with work tables at either end. We are getting good at moving boats around when someone needs to work on an end and even better at moving around each other in the tight space.
Stanchions stacked on the strong backs ready to mount


Setting Up
1. After we set the strong backs on studio tables and sawhorses, we used a piece of taught fishing line attached at each end of the strong back to establish a level measure and a center line. 
2. We then measured off the 2' intervals from the plans and drew lines  perpendicular to the fishing line to establish the position of the station molds.  
3. At each 2' interval, we mounted two 16" stanchions cut from 1"x2" common pine. 


Colton mounts the station molds using the orange string to line them up along the center.

Setting Up the Molds
1. We cut recycled bike box cardboard to the templates in the plans.
2. We attached the molds to the stanchions with 1" drywall screws.
3. We then ran a string along the top of the molds and used a level to insure that the molds were aligned with one another and set level between the two lines. 


While the students cut their own molds, I made a set of masters to the molds because we are using 3/4 inch width stringers rather than the 3/8's the plans call for, so all of the notches have to be doubled in size.


Chris mounts stanchions on the strong back while Nate and Mathias cut molds from recycled bike boxes.


Even though Monfort's notes mention using cardboard for the molds, we were skeptical that it would be able to withstand the compression toward the center of the boat from the stringers and the gunwales, especially because we were building with thicker wood. But the notched cleats we added to the two middle stations have taken care of the compression of the gunwales, all fabricated out of wood Home Depot had thrown out because of defects. 

Even though our oversized stringers exert considerable compression, the cardboard has held up in all but several cases. Where it failed, we have merely hot-glued small scraps of wood to regain the original shape. Without the cardboard, we would have had to use a sheet of plywood per boat, all of which would have become scrap at the end of the project.

The Knee-Stem Assembly


Because the knee and stem are both curved and made of 3/8" oak and marine plywood, they are hard to clamp together with traditional clamps. I made jigs of scrap wood cut with a jig saw. Students then put pressure on the glued joint by lightly driving small wedges between the jig and the glued parts. The piece of white waxed paper prevents the glued pieces from sticking to the jig. 

Ripping the Keelsons, Stringers, Gunwales, and Inwales

The best straight grained wood available locally was a set of Douglas fir boards in 1"x6"x15' from an excellent wood supplier, Anderson McQuaid, a mile from the school. They allowed me to select boards that were almost entirely knot free. Because the school's table saw does not have a long enough run to rip this length, I set my table saw with a 16' outrun in my garage and used three rollers, one set up in front of the saw to help roll the stock off the back of my pickup to the saw and two to catch the sawn lumber in out feed. 

Plan on the better part of a weekend day if you are selecting and ripping the parts for a set of boats. Ours required 40 pieces of 1"x3/8"x15' for the keelsons, gunwales, and inwales and 80 3/4"x3/8"x15' pieces for the stringers.

I cut our knees on a scroll saw from 3/8" marine plywood and the oak stems from scraps of 3/8" quarter sawn oak but a common jig saw could easily make the cuts. 


Gluing on the Stems

Next we glued a 1"x3/8" piece of Douglas fir to the two knees and stems with the stems temporarily hot glued to a cleat at each end. To allow students to clamp the curved knee to the stem, I made jigs with a piece of wood that matched the curve of the knee sandwiched between two rectangular pieces of wood.

Detail of clamping jig for knee/keelson assembly


Pre-Bending the Gunwales
While we were completing the first steps, we had attached the gunwales to the two ends of the strong back and then bent the wood  using a spacer block in the middle. The gunwales have to bend in a compound curve, and Monfort's notes recommend pre-bending the wood before adding it to the stations. This system worked quite well.


Detail showing notched plywood at each end to hold gunwales

Mounting the Gunwales


The angles of the joint between stem and gunwales make it difficult to clamp. Here Andrew has used paper to cushion the zip tie he's using. Students found all kinds of ways to clamp using zip ties and combinations of conventional clamps. 

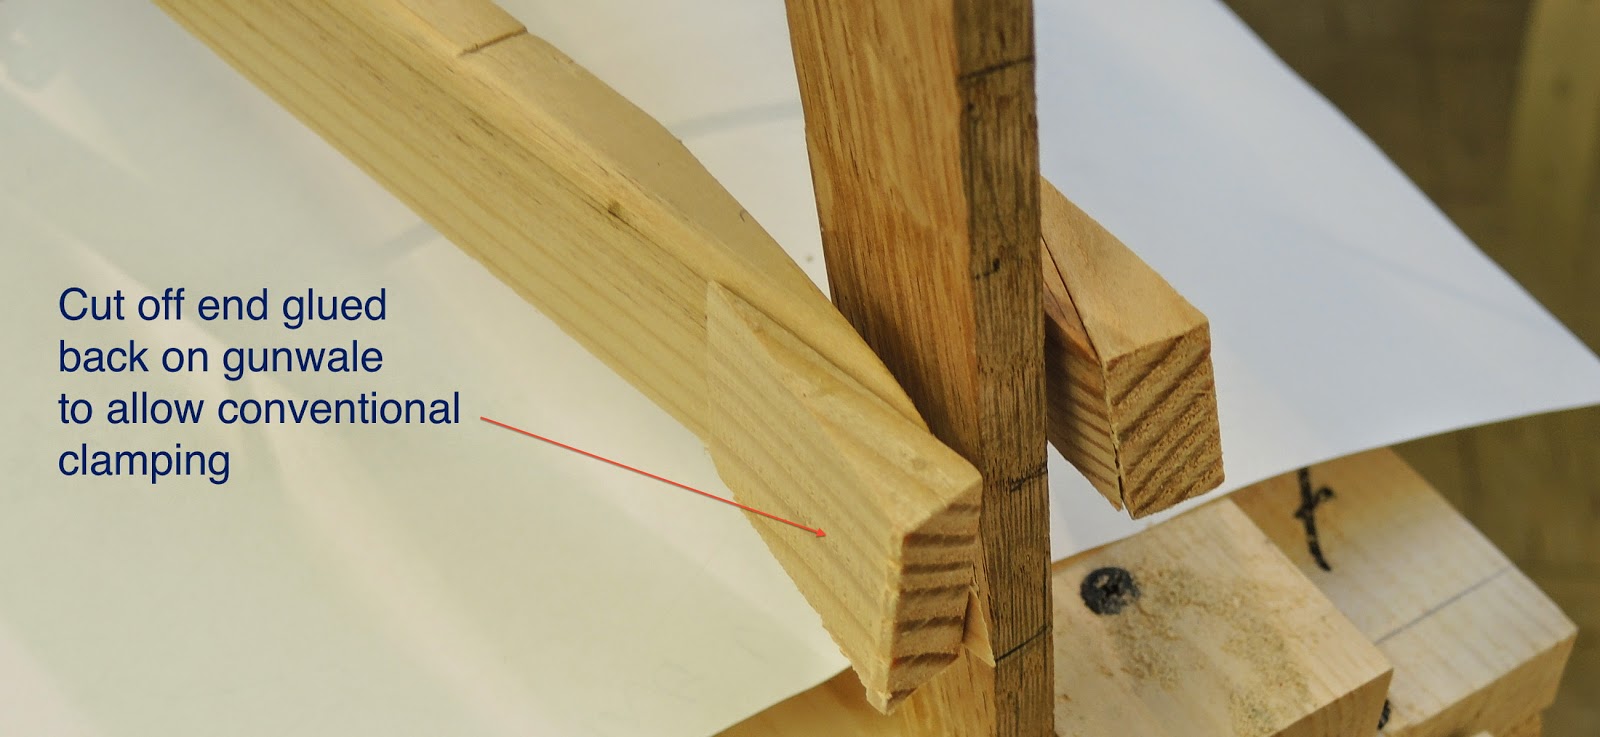
Monfort recommends glueing the cut off ends of the gunwales and stringers to those pieces to create a flat clamping surface as in the example below:


But this process can pull some of the gunwale's outer grain away with the wedge when you try to remove it. If you hot glue the wedges to your clamp and then hot glue 80 grit sandpaper to the surface, you can get the same clamping effect but without harming the surface of the gunwale.


Starting Out


The Course
We are posting here an account of our canoe building project, part of a one semester class for high school seniors. The course focuses on the cultural history and geography of coastal Maine. We chose the canoe as a central part of the course because of its important place in the earliest settlement of the coast by Native Americans and its resurgence in Maine's recent history as a means of recreation. Students will build the canoes this spring and then use them on a trip along the Maine coast at the end of the course.


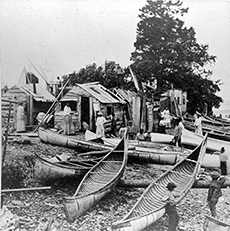
Indian encampment in Bar Harbor, 1881. Stereoview by Kilburn Brothers.


The Boats
The model of touring canoe we are building was  designed in the early 1980's by Platt Monfort, who lived along the Sheepscot River in Westport, Maine. Monfort started with the original shape and concept of the birch bark canoe which startled early European visitors to the New England coast because of its light weight construction and ease of paddling. Monfort designed his canoes around the construction principles of the Maine peapod, a double ended fishing boat, with oak stems, knees, a keel with moderate rocker and a gunwale-rib-inwale sandwich. But his boats are much lower than traditional canoes and peapods, like the Rushton canoes from the 1890's, with a deep sheer to allow a paddler to use a double paddle in a seated position.

The biggest innovations Monfort added to canoe design were the use of aircraft dacron wrapped over a very lightweight set of stringers and longitudinal  stiffening through the use of kevlar roving, techniques employed in the construction of light aircraft and gliders. His 14' boats often weigh as little as 20 pounds, half the weight of a similar boat built in fiberglass or aluminum. His work represents the unusual blend of tradition and innovation that has characterized Maine's boatbuilding industry over the past forty years with the introduction of epoxies and hybrid materials like carbon fiber and kevlar to a long standing traditions in wood construction. 


SnowShoe 14
Platt Monfort's Geodesic Airolite Canoe

Our Shop

We are using a 24' square classroom, most often used as an art studio. We have access to a very well-equipped wood shop down the hall with a table saw, chop saw, and band saw - and the advice of the master craftsman who teaches there - but we only use the shop on weekends or evenings as it regularly serves as many as fifty students during the class day. While power saws are important for ripping the stringers and ribs and fashioning knees, thwarts, stems, and floorboards, most of the boat's fabrication depends on small pull saws, rasps, and various clamping devices. With the loan of a table saw to do the ripping of most parts and a jig saw to cut the stems, knees, and thwart gussets, this project is feasible for groups with modest means. 

Strong backs under construction

Beginning

We began our canoe building project by constructing 8 strong backs out of 1x8 pine we purchased from a local box maker. We set an early goal of trying to build as inexpensively as possible and with the fewest power tools so that we could model the project for schools and groups with limited shop access. The boards came in 14' lengths so required no cutting. While many of them warped more than plywood would have done, we built using a system of stanchions that allowed us to correct the alignment of the station molds to overcome irregularities in the 1x8's. Scrap plywood spacers helped us align the boards and 1
5/8 drywall screws held the assembly together.